 Picked up this Dahon Vitesse 3 speed on CL recently. It was actually $100, but the guy threw in his El Bolso bag with it. The El Bolso hadn’t even been used! Well, I sold the El Bolso for $40. Thus, my net for the Dahon was $60. I don’t know what I’ll do with another bike, but at this price I couldn’t pass it up. I’ll post a review later.
Monday, November 28, 2011
Paid $60 for this Dahon on Craigslist!
Picked up this Dahon Vitesse 3 speed on CL recently. It was actually $100, but the guy threw in his El Bolso bag with it. The El Bolso hadn’t even been used! Well, I sold the El Bolso for $40. Thus, my net for the Dahon was $60. I don’t know what I’ll do with another bike, but at this price I couldn’t pass it up. I’ll post a review later.
Tuesday, September 27, 2011
Another Dollar Store Find.

Found this at the Dollar Tree. Anyone who commutes in an urban area could really use this air horn. I carry one of these by mask taping it to my handlebar. When you’ve expended all the air, just tear it off and do it again. Masking tape leaves very little, if any, sticky residue. Or you could always carry it on our waist or backpack. Also, helpful to scare away dogs. For $1, it’s a steal.
Thursday, July 7, 2011
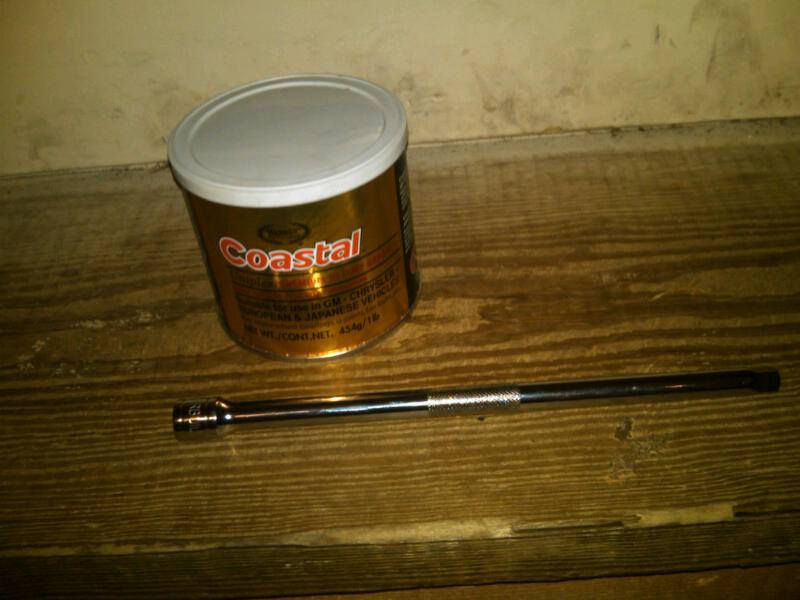
Re-lubing, Re-conditioning the Downtube front suspension fork.
As I posted earlier, I found that my stock downtube 8H front fork did not have as much travel as my Full suspension downtube. I ended up buying an earlier downtube front fork from J. Monti. It did have more travel. The fork worked well, but I could detect a little grittiness coming from the fork as I bounced it up and down.

So, I undertook this project to recondition, or relube, the front fork so it could have freer up/down play. Tools needed:
*Socket extension bar (I think mine is 9” or 10”)
*5mm socket
*Cheap Automobile grease (I used Coastal hi-temp grease)
*Skintight nitrile or other surgical type gloves (to keep your hands clean)

It is a straightforward job. You undo the Vbrakes, remove the wheel. Remove the protective caps on the top of the suspension fork. Insert the socket extension until you feel yourself gripping the screw head. Then, just turn counterclockwise. The fork will separate from the bottom part when you fully loosen the screws. And, the bottom fork bars will slide down.
As you hold the bottom part of the fork, turn it over. The springs will come out. There are some rubber (?) inserts/bushings at the top and bottom of the springs (see pix).That’s pretty much it.

As I suspected, the springs were dry. Some dirt may have penetrated there contributing to that gritty feeling. I lightly cleaned the springs with a cloth. You can be anal and dip the springs in gasoline or some other solvent, but I didn’t do that. Then, I just liberally slogged the grease on the springs all over. I guess the springs looked like tree branches after freezing rain (only with grease not ice). Then, I dropped the springs in the bottom part of the fork, connected it to the top part, and rescrewed. Finally, attach the wheel and brakes.
Much better. I now have a front fork that “gives” much better than it used to. This is a job you can do if you want more play or, I guess, if you have too much play, you can remove some excess grease and dry up your front fork a little. I was afraid that there would be some sort of complicated spring mechanism that I would have trouble putting back together. It was nothing like that.
This guide doesn’t have to be limited to DT bikes, but other MTB-type bikes esp. with cheap suspension forks. You’d just need a longer extension (maybe) or a different size socket.
Tuesday, June 28, 2011
Folding bike at COSTCO!
Spotted this folding bike yesterday when I was at the COSTCO. This model looks like those old Hummer/Montague folding bikes of yesteryear. Price was $399.99 USD. Bike had 26” wheels and had an impressive looking air rear suspension. It is also equipped with disc brakes and front suspension. I noticed that the rear derailleur was “Altus”. Model of the bike was “Cam Rock”. The box said the company was “Kent Bicycles”, which are not known for providing quality bikes. COSTCO usually stands by their products so perhaps this is different.
Anyway, I got excited to see a folding bike at a well-known retailer like COSTCO.

Thursday, April 28, 2011
A Request for Bike Tube Manufactures: Put the Seams Away from the Center!
I've repaired my share of flats in my day and 9 times out of 10, the puncture is at the center of the tube. And, it's usually right next to the joining raised seam of the rubber tube. For repairing a flat, you have to ground down the area around the h ole with that mini scraper. With the puncture next to the seam, it makes it harder to grind away most of the raised joining seam. Sometimes I've had unsuccessful flat repairs because I didn't prep (i.e. grind down the seam) the area around the hole enough.
 ole with that mini scraper. With the puncture next to the seam, it makes it harder to grind away most of the raised joining seam. Sometimes I've had unsuccessful flat repairs because I didn't prep (i.e. grind down the seam) the area around the hole enough.
I was wondering why bike tube manufacturers don't put this seam on the sides or at another place where punctures don't usually happen. Or, how about putting the seam on the inside of the tube (and inverted seam tube!)? I don't know if this is even possible with bike tubes but I thought I'd post about my gripe.
Monday, March 7, 2011
Best shoes for casual riding: Leather and cheap.
As I’ve mentioned, I don’t clip in anymore. My short trips and urban riding make it much easier to just wear everyday shoes and platform pedals. That usually means dress shoes for commuting to my subway stop. Or nicer, dress casual shoes for dress-down days.
When I do errand running or long weekend rides, I tend to wear tennis shoes. These shoes most always feature leather uppers. It’s amazing what kind of hits and dings your feet take when biking. When stopped, I tend to rotate my pedals to a 1 to 3 o’clock position. This enables me to pedal off quickly when I have to go. I bring up my pedals with the top of my shoes to get to this position. Jagged or sharp platfor m pedals can scuff your shoes as you do this. Using shoes make of synthetic materials i.e. running shoes means that they will scuff quickly and could tear. Try to go for leather uppers instead. I prefer them to be white in color. Darker colors tend to heat up quicker in the sun.
I’ve found that leather tennis shoes are really great in cutting out the scuffs and dings. And, there are so many manufacturers of these types of tennis shoes that it’s easy to find them relatively cheap. I think I bought the two shoes in the pix at Marshalls or Ross discount apparel stores. I just picked up the Fila’s at the top for $19.99 (!). Read the label on the inside of the tongue to make sure you get leather uppers. Manufacturers are legally required to put the content of their shoes on the tongue. There are many shoes that look like leather, but in reality are synthetic.
When I do errand running or long weekend rides, I tend to wear tennis shoes. These shoes most always feature leather uppers. It’s amazing what kind of hits and dings your feet take when biking. When stopped, I tend to rotate my pedals to a 1 to 3 o’clock position. This enables me to pedal off quickly when I have to go. I bring up my pedals with the top of my shoes to get to this position. Jagged or sharp platfor
 m pedals can scuff your shoes as you do this. Using shoes make of synthetic materials i.e. running shoes means that they will scuff quickly and could tear. Try to go for leather uppers instead. I prefer them to be white in color. Darker colors tend to heat up quicker in the sun.
I’ve found that leather tennis shoes are really great in cutting out the scuffs and dings. And, there are so many manufacturers of these types of tennis shoes that it’s easy to find them relatively cheap. I think I bought the two shoes in the pix at Marshalls or Ross discount apparel stores. I just picked up the Fila’s at the top for $19.99 (!). Read the label on the inside of the tongue to make sure you get leather uppers. Manufacturers are legally required to put the content of their shoes on the tongue. There are many shoes that look like leather, but in reality are synthetic.
Monday, February 7, 2011
Falling is easier on a folding bike.
Add the above to the benefits of riding a folding bike. This morning I took a tumble over some black ice. I went around this little puddle, which I could see was glazed at the top. Turns out that the radius of ice surrounding the pond was greater than I thought. I went around it and my Brompton fishtailed from under me. I landed on my hands ok. My only scrape was my back heel, which was probably caught under one of pedals. Did not tear any of my clothing and my gloves didn’t even get wet.
I was not going that fast so that probably helped. I’m thinking that the small dimensions of my bike allowed me to straddle over it enough to land on my hands. Also, the small wheels probably keep you closer to the ground. I keep thinking that if I was on my full size bike, it would have been a bad fall. I think I could have ended up on my side with a bruised shoulder or maybe even a broken collarbone.
Anyway, I’m glad I’m ok and will give such puddles plenty of clearance in the future. Be safe out there.
Wednesday, January 5, 2011
Subscribe to:
Posts (Atom)