Sad post to start of the new year. The Novara Transfer, which I reviewed in my last post, was stolen from a bike noodle. I didn't have a U lock on it, but it was a pretty robust cable lock that is shaped like a U lock. This lock is a small, thick rubber encased cable and not like the traditional cable locks that are sold in your Xmart stores.
I filed a police report today at lunch. The officer who took the report said he was going to look at some security cams that may have filmed the bike being stolen. Yay for living in one of the cities with the most security cams in the world! Also, I posted a "bike stolen!" post on Craigslist. And, I'll check on CL frequently to see if anyone is selling a Novara Transfer. Hopefully, I'll report some good news on this in the future.
Monday, January 6, 2014

Tuesday, August 13, 2013
Another commuter added to stable: Review of REI’s Novara Transfer.
MSRP=$799
Price Paid=$639.20 (used REI 20% off coupon)
 Picked up another commuter that will get extensive use as a
short range commuter. Basically will use
it to get to the subway station and/or for trips to the grocery store. First, this is a steel framed commuter, which
gives you a more comfortable ride vs. an aluminum bike with no suspension. REI really thought this bike out to give commuters
a lot of necessary bells/whistles.
Picked up another commuter that will get extensive use as a
short range commuter. Basically will use
it to get to the subway station and/or for trips to the grocery store. First, this is a steel framed commuter, which
gives you a more comfortable ride vs. an aluminum bike with no suspension. REI really thought this bike out to give commuters
a lot of necessary bells/whistles.
Likes:
Upright ride. The design of this bike allows you to 1) sit
upright and 2) let your elbows fall comfortably at your side. The result: you get to ride and see the world
around you. This is so much better that
being hunched over the handlebars. The
drawbacks of an upright ride are that you won’t obtain an “aero” position and
won’t go superfast. But that’s not what
a city commuter bike is meant to do.
IGH (internal gear hub).
Again, the great benefit in having an IGH in a commuter is you can downshift
gears while at a stop. This is easier on
your knees! Has a nice range of 7 gears
in the included Shimano Nexus hub. I had
had an issue with an earlier Nexus 7 hub that kind of froze up when I left this
bike out in sub 32 degree weather. That
issue was not duplicated when I used a Shimano Alfine 8 speed hub, though. We
shall see if this Nexus hub freezes up like the old models.
Generator powered light. This light works when you pedal. It
is not a bright light by any means, but it helps cars see you when you are
coming towards them. The brand of the
light is “Basta” which has a good reputation in Europe. Perhaps I can replace the bulb when it gives
out with an LED light. LEDs give you
more light using the same battery as a basic bulb that you have in flashlights,
for example.
Chainguard. As I’ve
mentioned before, to attract bikes to the masses, you need to make bikes
friendly to everyone. That means being able to ride bikes in everyday
clothes. You can safely wear pants to ride this
bike with the chainguard! No need to
wear spandex or even rolling up your pants legs so that they won’t get
caught in the chain.
Dislikes:
Fenders. I like that this bike came with fenders. Fenders are great when riding in the rain as
they prevent rain splatter from going up your back as you ride in the rain. But
REI put on some steel fenders on this bike.
That may have been a mistake. I recently chipped the front fender and
there is some rust forming on there (see pix).
Perhaps, they should have installed some aluminum or plastic fenders to
avoid this.
Cork handgrips. I
will sometimes leave this bike outside at a bike rack and exposed to the sun
and elements. After I left it out one
time, I came back to it and found that the cork grips were sticky. I’m not sure
if the sun did it or a little bit of rain, but the cork seems to be
releasing some goo. It doesn’t feel good to ride
and have some sticky residue left in your hands after you dismount. The cork grips look cool and are very
aesthetic, but a better choice would have been to use rubber.
Wednesday, April 3, 2013
Floating style chainguard.
Sorry I haven't posted in so long. Still bicycling/commuting. Not as much
due to work and family but I can’t give it up!
So I bought this chainguard from a local cyclist that was
selling his on craigslist. Pretty sure it’s this OGK chainguard by Soma
Fabrications:
The only hangup was that the seat tube was a little thicker
than the downtube. So, I had to use a
larger hoseclamp for the thicker tube. The included tube wraparounds weren’t
long enough. I couldn’t get it to set
flat and upright. It kinda juts out in the back, but since your pants go up when you pedal, it doesn’t get caught. Gotta
be careful when you bring you straddle the bike, or you could hit it. Kinda “floats” over the chain. Pretty
cool. Working well so far.


Monday, February 13, 2012
 So far we’ve had very mild winter temperatures. This weekend, however, we had a cold blast that came down from Canada and dropped our temperatures to below freezing. I think yesterday’s high was around 31 and Saturday was a little bit colder. Thus, I left my bike outside rather than in the comfort of my garage to try an experiment.
This morning (temp 25 degrees) I rode it after it sat outside the whole weekend and it shifted fine. I had a prior problem with the Nexus 7 that seemed to not shift during prolonged subfreezing temperatures. For the Nexus 7, the indicator showed that I had downshifted or upshifted, but the gear inside the hub did not move. I can only attribute this to subfreezing temperatures since it shifted fine when things warmed up. Maybe the Nexus 7 uses a more liquid-type grease in there (?). So count this as an advantage for the Nexus Alfine.
I realize that our cold temperatures are laughable to some of you in colder climes, but there you go. Maybe if average temps are the in the teens or single digits, it could affect the Alfine, but we haven’t gotten those this year. And, I don’t know if I would have any desire to ride in that kind of weather, lol.
Monday, November 28, 2011
Paid $60 for this Dahon on Craigslist!
 Picked up this Dahon Vitesse 3 speed on CL recently. It was actually $100, but the guy threw in his El Bolso bag with it. The El Bolso hadn’t even been used! Well, I sold the El Bolso for $40. Thus, my net for the Dahon was $60. I don’t know what I’ll do with another bike, but at this price I couldn’t pass it up. I’ll post a review later.
Tuesday, September 27, 2011
Another Dollar Store Find.

Found this at the Dollar Tree. Anyone who commutes in an urban area could really use this air horn. I carry one of these by mask taping it to my handlebar. When you’ve expended all the air, just tear it off and do it again. Masking tape leaves very little, if any, sticky residue. Or you could always carry it on our waist or backpack. Also, helpful to scare away dogs. For $1, it’s a steal.
Thursday, July 7, 2011
Re-lubing, Re-conditioning the Downtube front suspension fork.
As I posted earlier, I found that my stock downtube 8H front fork did not have as much travel as my Full suspension downtube. I ended up buying an earlier downtube front fork from J. Monti. It did have more travel. The fork worked well, but I could detect a little grittiness coming from the fork as I bounced it up and down.

So, I undertook this project to recondition, or relube, the front fork so it could have freer up/down play. Tools needed:
*Socket extension bar (I think mine is 9” or 10”)
*5mm socket
*Cheap Automobile grease (I used Coastal hi-temp grease)
*Skintight nitrile or other surgical type gloves (to keep your hands clean)

It is a straightforward job. You undo the Vbrakes, remove the wheel. Remove the protective caps on the top of the suspension fork. Insert the socket extension until you feel yourself gripping the screw head. Then, just turn counterclockwise. The fork will separate from the bottom part when you fully loosen the screws. And, the bottom fork bars will slide down.
As you hold the bottom part of the fork, turn it over. The springs will come out. There are some rubber (?) inserts/bushings at the top and bottom of the springs (see pix).That’s pretty much it.

As I suspected, the springs were dry. Some dirt may have penetrated there contributing to that gritty feeling. I lightly cleaned the springs with a cloth. You can be anal and dip the springs in gasoline or some other solvent, but I didn’t do that. Then, I just liberally slogged the grease on the springs all over. I guess the springs looked like tree branches after freezing rain (only with grease not ice). Then, I dropped the springs in the bottom part of the fork, connected it to the top part, and rescrewed. Finally, attach the wheel and brakes.
Much better. I now have a front fork that “gives” much better than it used to. This is a job you can do if you want more play or, I guess, if you have too much play, you can remove some excess grease and dry up your front fork a little. I was afraid that there would be some sort of complicated spring mechanism that I would have trouble putting back together. It was nothing like that.
This guide doesn’t have to be limited to DT bikes, but other MTB-type bikes esp. with cheap suspension forks. You’d just need a longer extension (maybe) or a different size socket.
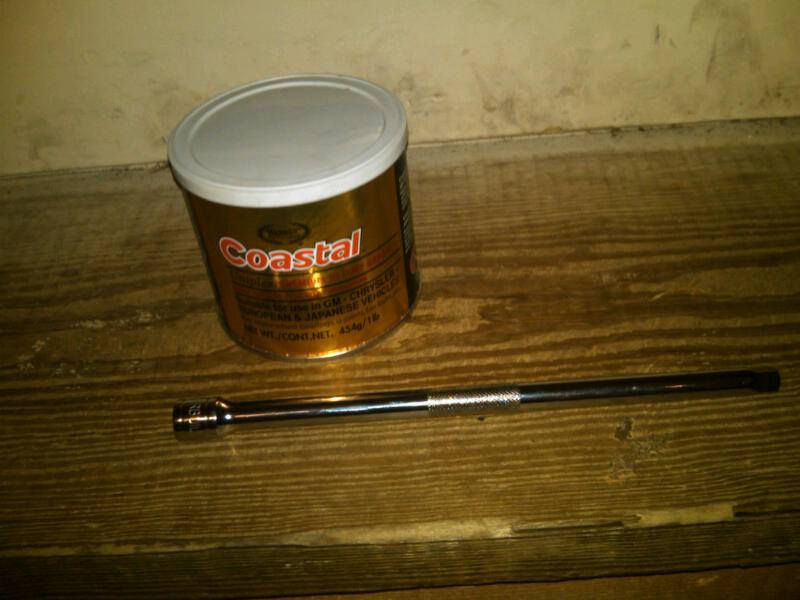
So, I undertook this project to recondition, or relube, the front fork so it could have freer up/down play. Tools needed:
*Socket extension bar (I think mine is 9” or 10”)
*5mm socket
*Cheap Automobile grease (I used Coastal hi-temp grease)
*Skintight nitrile or other surgical type gloves (to keep your hands clean)

It is a straightforward job. You undo the Vbrakes, remove the wheel. Remove the protective caps on the top of the suspension fork. Insert the socket extension until you feel yourself gripping the screw head. Then, just turn counterclockwise. The fork will separate from the bottom part when you fully loosen the screws. And, the bottom fork bars will slide down.
As you hold the bottom part of the fork, turn it over. The springs will come out. There are some rubber (?) inserts/bushings at the top and bottom of the springs (see pix).That’s pretty much it.

As I suspected, the springs were dry. Some dirt may have penetrated there contributing to that gritty feeling. I lightly cleaned the springs with a cloth. You can be anal and dip the springs in gasoline or some other solvent, but I didn’t do that. Then, I just liberally slogged the grease on the springs all over. I guess the springs looked like tree branches after freezing rain (only with grease not ice). Then, I dropped the springs in the bottom part of the fork, connected it to the top part, and rescrewed. Finally, attach the wheel and brakes.
Much better. I now have a front fork that “gives” much better than it used to. This is a job you can do if you want more play or, I guess, if you have too much play, you can remove some excess grease and dry up your front fork a little. I was afraid that there would be some sort of complicated spring mechanism that I would have trouble putting back together. It was nothing like that.
This guide doesn’t have to be limited to DT bikes, but other MTB-type bikes esp. with cheap suspension forks. You’d just need a longer extension (maybe) or a different size socket.
Tuesday, June 28, 2011
Folding bike at COSTCO!
Spotted this folding bike yesterday when I was at the COSTCO. This model looks like those old Hummer/Montague folding bikes of yesteryear. Price was $399.99 USD. Bike had 26” wheels and had an impressive looking air rear suspension. It is also equipped with disc brakes and front suspension. I noticed that the rear derailleur was “Altus”. Model of the bike was “Cam Rock”. The box said the company was “Kent Bicycles”, which are not known for providing quality bikes. COSTCO usually stands by their products so perhaps this is different.
Anyway, I got excited to see a folding bike at a well-known retailer like COSTCO.

Thursday, April 28, 2011
A Request for Bike Tube Manufactures: Put the Seams Away from the Center!
I've repaired my share of flats in my day and 9 times out of 10, the puncture is at the center of the tube. And, it's usually right next to the joining raised seam of the rubber tube. For repairing a flat, you have to ground down the area around the h ole with that mini scraper. With the puncture next to the seam, it makes it harder to grind away most of the raised joining seam. Sometimes I've had unsuccessful flat repairs because I didn't prep (i.e. grind down the seam) the area around the hole enough.
 ole with that mini scraper. With the puncture next to the seam, it makes it harder to grind away most of the raised joining seam. Sometimes I've had unsuccessful flat repairs because I didn't prep (i.e. grind down the seam) the area around the hole enough.
I was wondering why bike tube manufacturers don't put this seam on the sides or at another place where punctures don't usually happen. Or, how about putting the seam on the inside of the tube (and inverted seam tube!)? I don't know if this is even possible with bike tubes but I thought I'd post about my gripe.
Monday, March 7, 2011
Best shoes for casual riding: Leather and cheap.
As I’ve mentioned, I don’t clip in anymore. My short trips and urban riding make it much easier to just wear everyday shoes and platform pedals. That usually means dress shoes for commuting to my subway stop. Or nicer, dress casual shoes for dress-down days.
When I do errand running or long weekend rides, I tend to wear tennis shoes. These shoes most always feature leather uppers. It’s amazing what kind of hits and dings your feet take when biking. When stopped, I tend to rotate my pedals to a 1 to 3 o’clock position. This enables me to pedal off quickly when I have to go. I bring up my pedals with the top of my shoes to get to this position. Jagged or sharp platfor m pedals can scuff your shoes as you do this. Using shoes make of synthetic materials i.e. running shoes means that they will scuff quickly and could tear. Try to go for leather uppers instead. I prefer them to be white in color. Darker colors tend to heat up quicker in the sun.
I’ve found that leather tennis shoes are really great in cutting out the scuffs and dings. And, there are so many manufacturers of these types of tennis shoes that it’s easy to find them relatively cheap. I think I bought the two shoes in the pix at Marshalls or Ross discount apparel stores. I just picked up the Fila’s at the top for $19.99 (!). Read the label on the inside of the tongue to make sure you get leather uppers. Manufacturers are legally required to put the content of their shoes on the tongue. There are many shoes that look like leather, but in reality are synthetic.
When I do errand running or long weekend rides, I tend to wear tennis shoes. These shoes most always feature leather uppers. It’s amazing what kind of hits and dings your feet take when biking. When stopped, I tend to rotate my pedals to a 1 to 3 o’clock position. This enables me to pedal off quickly when I have to go. I bring up my pedals with the top of my shoes to get to this position. Jagged or sharp platfor
 m pedals can scuff your shoes as you do this. Using shoes make of synthetic materials i.e. running shoes means that they will scuff quickly and could tear. Try to go for leather uppers instead. I prefer them to be white in color. Darker colors tend to heat up quicker in the sun.
I’ve found that leather tennis shoes are really great in cutting out the scuffs and dings. And, there are so many manufacturers of these types of tennis shoes that it’s easy to find them relatively cheap. I think I bought the two shoes in the pix at Marshalls or Ross discount apparel stores. I just picked up the Fila’s at the top for $19.99 (!). Read the label on the inside of the tongue to make sure you get leather uppers. Manufacturers are legally required to put the content of their shoes on the tongue. There are many shoes that look like leather, but in reality are synthetic.
Monday, February 7, 2011
Falling is easier on a folding bike.
Add the above to the benefits of riding a folding bike. This morning I took a tumble over some black ice. I went around this little puddle, which I could see was glazed at the top. Turns out that the radius of ice surrounding the pond was greater than I thought. I went around it and my Brompton fishtailed from under me. I landed on my hands ok. My only scrape was my back heel, which was probably caught under one of pedals. Did not tear any of my clothing and my gloves didn’t even get wet.
I was not going that fast so that probably helped. I’m thinking that the small dimensions of my bike allowed me to straddle over it enough to land on my hands. Also, the small wheels probably keep you closer to the ground. I keep thinking that if I was on my full size bike, it would have been a bad fall. I think I could have ended up on my side with a bruised shoulder or maybe even a broken collarbone.
Anyway, I’m glad I’m ok and will give such puddles plenty of clearance in the future. Be safe out there.
I was not going that fast so that probably helped. I’m thinking that the small dimensions of my bike allowed me to straddle over it enough to land on my hands. Also, the small wheels probably keep you closer to the ground. I keep thinking that if I was on my full size bike, it would have been a bad fall. I think I could have ended up on my side with a bruised shoulder or maybe even a broken collarbone.
Anyway, I’m glad I’m ok and will give such puddles plenty of clearance in the future. Be safe out there.
Wednesday, January 5, 2011
Thursday, December 30, 2010
Downtube front fork swap out.

I may have mentioned this in one of my earlier posts that the 2009.5 Downtubes have a different front suspension fork that earlier ones. You can tell because there seems to be less travel in the new fork than the old ones. If you look at some pictures of new DT bikes, the shiny inner part of the fork seems to be a few centimeters shorter than the older ones. I like my bike to have a cushy front fork (i.e. more travel).
After a long search, I found a guy that had a front fork from an old Downtube (Thanks, Joseph Monti!). I paid $35 for his fork shipped. In addition, it’s kinda hard to find compatible forks for Downtube. They have to be 1 1/8” diameter and threaded. And, as I understand it, all threads are not alike. They’re supposed to be standard, but I’ve heard of some threads that do not match. I asked some LBS guys about buying a non-threaded fork and have them “cut” threads for one. They were wary about the threads matching and recommended against this.
Sure, you can buy a new fork on the DT site, but I was afraid I’d get one of the newer lesser suspension forks. After I got it, I immediately compressed it by hand on my floor and was confident it would work because it ‘gave’ way more than the old one. (BTW, Downtube has some fancy suspension adjustable forks on their site, but they are about $1K. That’s more than a new Downtube bike!)
The swap was fairly straightforward since everything matched. It was more time-consuming to move the brakes to the new fork and dial those in. The result: yes, my DT does have more cushiness, but some of the grease inside this replacement fork may have dried up. It could be better. Also, the color of the fork is dark blue so it doesn’t match my red bike (minor negative). I’ll probably have to take the fork apart and relube it. That will be a subject of a future post.
Thursday, November 25, 2010
Brompton Assembly Video.
Recorded this snippet from a TV show on how the Brommie is made. Pretty cool stuff.
Brommie Assembly. from jo dimes on Vimeo.
Thursday, November 11, 2010
Cateye Vectra Wireless Speedometer Quickie Review

I ran this Cateye Vectra first on the Brompton then on the Downtube. I bought it in February 2009 and just recently it started messing up. I could hear the magnet clicking on every turn of the wheel, but it would not register as a revolution on the main unit. At first I thought it was the battery so I replaced that (both on the main unit and the wheel sensor). That didn’t solve the problem.
I thought maybe that my cell phone was interfering with the signal transmission, but a few rides without my cell proved that theory wrong. I finally figured out that the unit had to be closer to the wheel sensor. The main unit needed to be nearer about an extra three to six inches. I don’t know why this Cateye started putting out a weaker signal all of a sudden.
Needless to say I couldn’t bring the unit closer to the wheel sensor unless I brought the handlebars down considerably. Or, install some 12” wheels on the Downtube, ha-ha.
I thought maybe that my cell phone was interfering with the signal transmission, but a few rides without my cell proved that theory wrong. I finally figured out that the unit had to be closer to the wheel sensor. The main unit needed to be nearer about an extra three to six inches. I don’t know why this Cateye started putting out a weaker signal all of a sudden.
Needless to say I couldn’t bring the unit closer to the wheel sensor unless I brought the handlebars down considerably. Or, install some 12” wheels on the Downtube, ha-ha.
I can’t recommend this Cateye Vectra. It lasted about 1 year and 8 months. Cateye supposedly makes good quality units. It was pricey, too. MSRP is/was $40 but I paid $35 for it on sale.
Tuesday, October 19, 2010
Primo Comet Tires on Downtube 8H.
I was getting a little tired of the sluggishness from the Kenda Kwests that came with the Downtube 8H so I picked up some Primo Comet tires. These tires have gotten some good reviews on the Bikeforums community. They are smooth tire with just a very slight line pattern.

Yes, the tires are a big improvement over the Kendas, but I wouldn’t say it is like night and day in terms of change. The tires roll better than the Kendas, but I still detect a little hugging or grippishness (is that a word?) of the road. I think they could be a little nimbler. Another positive for the Primo comets are that they are 100psi tires. This is probably what makes them roll better than the Kendas. The Kendas max out at 60psi.
A caveat is in order, though. I continued the pattern of having a fatter tire in the back vs. the thin one in the front. The Kendas were 20x1.75” rear tire vs. 20x1.5” in the front. The Primos I went with are 1.90” for the rear tire vs. 1.50” for the front.
Why did I do this? I guess I “drank the koolaid” in that Downtube puts a wider tire in the rear for various reasons. I quote from the DT site:
Q Why do you have different front and rear tires on some models?
A This is one of the best features of our bikes. Note the forces on the front wheel are push based, and pull based on the rear. Pushing is "harder" than pulling, hence more energy is wasted up front. Hence we thinned the front tire. Additionally, the seat tube is angled back more weight is distributed towards the rear of the bike. Hence we put a wide rear tire for traction. This configuration is highly efficient, and very safe.
I believe some other bicycle experts also have recommended this, maybe even the late Sheldon Brown, but I’m not 100% sure on that.
Maybe I should have just kept a 1.5” Primo comet in the back (?). In addition, I couldn’t find a 1.75” Primo comet tire for the rear. The next closest size was 1.90” so I went with that. Maybe I installed too fat of a tire.
Another surprise is the weight of these tires vs. the Kendas. I weighed the Primos and the front one weighed 12.5 oz and the rear weighed 20oz. Both of these tires weigh just a little over 32oz, or 2 lbs, together. The Kendas weigh right around 1 lb each. The front Kenda tire was just a smidgen lighter than the rear. Therefore, you’re getting better performing and higher PSI tires for the same weight.
Bottom line: a nice upgrade over the Kenda Kwests, but still could be better. The best rolling tire I have found for a small wheeled bike is the yellow tag Brompton brand stock tires. Those roll very well and are 100psi tires.
Tag: Primo comet tire review.

Yes, the tires are a big improvement over the Kendas, but I wouldn’t say it is like night and day in terms of change. The tires roll better than the Kendas, but I still detect a little hugging or grippishness (is that a word?) of the road. I think they could be a little nimbler. Another positive for the Primo comets are that they are 100psi tires. This is probably what makes them roll better than the Kendas. The Kendas max out at 60psi.
A caveat is in order, though. I continued the pattern of having a fatter tire in the back vs. the thin one in the front. The Kendas were 20x1.75” rear tire vs. 20x1.5” in the front. The Primos I went with are 1.90” for the rear tire vs. 1.50” for the front.
Why did I do this? I guess I “drank the koolaid” in that Downtube puts a wider tire in the rear for various reasons. I quote from the DT site:
Q Why do you have different front and rear tires on some models?
A This is one of the best features of our bikes. Note the forces on the front wheel are push based, and pull based on the rear. Pushing is "harder" than pulling, hence more energy is wasted up front. Hence we thinned the front tire. Additionally, the seat tube is angled back more weight is distributed towards the rear of the bike. Hence we put a wide rear tire for traction. This configuration is highly efficient, and very safe.
I believe some other bicycle experts also have recommended this, maybe even the late Sheldon Brown, but I’m not 100% sure on that.
Maybe I should have just kept a 1.5” Primo comet in the back (?). In addition, I couldn’t find a 1.75” Primo comet tire for the rear. The next closest size was 1.90” so I went with
 that. Maybe I installed too fat of a tire.
Another surprise is the weight of these tires vs. the Kendas. I weighed the Primos and the front one weighed 12.5 oz and the rear weighed 20oz. Both of these tires weigh just a little over 32oz, or 2 lbs, together. The Kendas weigh right around 1 lb each. The front Kenda tire was just a smidgen lighter than the rear. Therefore, you’re getting better performing and higher PSI tires for the same weight.
Bottom line: a nice upgrade over the Kenda Kwests, but still could be better. The best rolling tire I have found for a small wheeled bike is the yellow tag Brompton brand stock tires. Those roll very well and are 100psi tires.
Tag: Primo comet tire review.
Thursday, September 16, 2010
Bike locker.
 Thought I’d post a pix of my bike locker. I’ve been renting out this bike locker from our transit authority. Cost is $87/year (although they are going to jack up the price to $200+ due to budget shortfalls). The locker is right on my subway stop. Thus, all I do is ride to my stop, put the bicycle in the locker, lock it up and get on the subway. Also, the space in the locker is like a triangle. You are supposed to “back in” your bike (handlebars will be towards the front).
 Great things about a bike locker:
-Bike is protected from the elements
-You can commute in an expensive bike w/o fear of it being stolen
-You can leave expensive lights, speedo, and other pricey accessories on the bike w/o fear of the
 m being ripped off (literally). See my earlier post: http://utilitycyclist.blogspot.com/2008/12/wanton-vandalism.html
Cons:
-Yearly cost. Ok, nothing in life is free.
-Yearly cost. Ok, nothing in life is free.
-My bikes are "average" sized so they fit fine in the locker. However, if you have a large-sized bike I think that they may be too tall for this particular locker style.
-Spiders and other insects seem to like living in adjacent lockers and sometimes hang out in mine.
-Spiders and other insects seem to like living in adjacent lockers and sometimes hang out in mine.
The first photo is my own bike locker when I rode the brompton one day. The second is a picture I found when I googled the phrase "bike locker". It is the exact same model as mine. I can also fit the brompton (folded) and a regular size bike in one locker.
Thursday, August 26, 2010
Cars slow down. Bikes don't have to.
My fair city/county (Arlington, VA) has got these neat speed bumps that have 2 grooves for bikes to go through. This is a great idea! The one I posted in my pix below is on a downhill, so I especially zoom down this incline.

I don’t think cars can cross the double yellow line in order to bypass these bumps (both wheels over the cut-outs). My neighbor told me that the local cops were ticketing cars that were doing this (I haven’t seen this). Rather, they should let the left wheel take the cut-out and right wheel go over the bump (on their side of the road). Hooray for traffic calming!

I don’t think cars can cross the double yellow line in order to bypass these bumps (both wheels over the cut-outs). My neighbor told me that the local cops were ticketing cars that were doing this (I haven’t seen this). Rather, they should let the left wheel take the cut-out and right wheel go over the bump (on their side of the road). Hooray for traffic calming!
Friday, July 23, 2010
Upgrades to Downtube 8H.
Hey all. Wanted to post a picture of some upgrades I’ve done to the Downtube 8H and explain them. Really enjoying the bike thus far. No problems yet. Still looking for a replacement front fork. Like I mentioned before, the Zoom fork doesn’t give as much as I’d like. It’s more of a road dampener.
Here’s the pix and what I’ve done.

New front ring: Ended up swapping out the front ring for a 38T ring (it came with a 46T front ring). I think the stock gearing on the 8H is a little high. There are some steep hills in my area that I need some help with in the form of a lower gear. If I lived in a flat area, I wouldn’t have done this upgrade.
Chainguard: You know I use my bikes for commuting in dress pants and khakis. Thus, I consider a chainguard a necessity. The stock 8H comes with a bashguard chain cover ring, that is ok. But as you ride your bike, the wind WILL whip your pants into the chain giving you some stains. The chainguard eliminates these problems. The chainguard brand is SKS. It fits front rings up to 40T. Also, the rear part of the chainguard expands and contracts so you can adjust it to fit. Also, you have to remove the bottom bracket to loop this chainguard around the front part.
Fenders: As I mentioned, the 8H comes with a rear fender only. And, the stock fender gives you 25% or so in coverage for the rear wheel. In the rain, this will give you some coverage, but not as good as a 50% coverage fender. I got that in the Planet bike 20” recumbent fender. The front fender is a Planet bike 20” front-wheel recumbent fender. The Planet bike fenders also have a very cool looking rubber slightly upraised flaps at the ends.
Pedals: Swapped the stock Wellgo folding pedals for some BMX-type pedals. The pedals are slightly lighter in weight (they are clear hard plastic) than the Wellgos and are wider which gives you more area to put your dogs on them. They also have upraised nubs that give you traction.
Rear rack: I took off the stock rack because it rides too low and close to the rear wheel. This causes heel strike if you use side pannier bags (which I often do). I installed an old “Performance Bike” rack that rides higher and eliminates the heel strike problem. I had to bend the rack extensions somewhat. A plus for the 8H is that it has plenty of holes to add another kind of rack. In a way, I hated to do this upgrade because the stock rack is custom designed for the 8H and is very aesthetically pleasing.
Reflective strips: Added some reflective strips for nighttime visibility. Although you can’t tell from the picture, the strips are red. The camera flash made it look a different color. I got these strips on ebay. They are plentiful there in all the colors you can think of. Shipping is low for most of these reflective strips since sellers can just put them in an envelope and ship them to you for the price of a stamp. I may have paid $2-3 total for these strips and had some left over.
That’s about it. Let me know if you see an old Downtube front suspension fork. I'm looking for one.
Here’s the pix and what I’ve done.

New front ring: Ended up swapping out the front ring for a 38T ring (it came with a 46T front ring). I think the stock gearing on the 8H is a little high. There are some steep hills in my area that I need some help with in the form of a lower gear. If I lived in a flat area, I wouldn’t have done this upgrade.
Chainguard: You know I use my bikes for commuting in dress pants and khakis. Thus, I consider a chainguard a necessity. The stock 8H comes with a bashguard chain cover ring, that is ok. But as you ride your bike, the wind WILL whip your pants into the chain giving you some stains. The chainguard eliminates these problems. The chainguard brand is SKS. It fits front rings up to 40T. Also, the rear part of the chainguard expands and contracts so you can adjust it to fit. Also, you have to remove the bottom bracket to loop this chainguard around the front part.
Fenders: As I mentioned, the 8H comes with a rear fender only. And, the stock fender gives you 25% or so in coverage for the rear wheel. In the rain, this will give you some coverage, but not as good as a 50% coverage fender. I got that in the Planet bike 20” recumbent fender. The front fender is a Planet bike 20” front-wheel recumbent fender. The Planet bike fenders also have a very cool looking rubber slightly upraised flaps at the ends.
Pedals: Swapped the stock Wellgo folding pedals for some BMX-type pedals. The pedals are slightly lighter in weight (they are clear hard plastic) than the Wellgos and are wider which gives you more area to put your dogs on them. They also have upraised nubs that give you traction.
Rear rack: I took off the stock rack because it rides too low and close to the rear wheel. This causes heel strike if you use side pannier bags (which I often do). I installed an old “Performance Bike” rack that rides higher and eliminates the heel strike problem. I had to bend the rack extensions somewhat. A plus for the 8H is that it has plenty of holes to add another kind of rack. In a way, I hated to do this upgrade because the stock rack is custom designed for the 8H and is very aesthetically pleasing.
Reflective strips: Added some reflective strips for nighttime visibility. Although you can’t tell from the picture, the strips are red. The camera flash made it look a different color. I got these strips on ebay. They are plentiful there in all the colors you can think of. Shipping is low for most of these reflective strips since sellers can just put them in an envelope and ship them to you for the price of a stamp. I may have paid $2-3 total for these strips and had some left over.
That’s about it. Let me know if you see an old Downtube front suspension fork. I'm looking for one.
Saturday, June 19, 2010
Keeping Your Toes Protected in Summer: Keen Newport Sandals
8/14/10 Update. I've gotta pull my recommendation of these sandals. The reason: foot odor. Mind you I don't have a foot odor problem, but my feet smell with these sandals. The inner soles say "anti odor anatomic footbed" but that doesn't prevent my problem. I don't understand why since these Newports are pretty well ventilated. The only time I've had a foot odor problem was when I wore some waterproof (and non ventilated) Rockport shoes. My feet got really hot in those, which caused the foot odor after a while. Since I didn't buy these at REI, I'll have to keep them. I'll wear them while bicycling, but I'll try not to walk with them so much.
Summer's here and I doing more casual riding. By this I mean going to the grocery store, ATM machine, ice cream or coffee shop. I had been doing this with my running sneakers, but when you ride in the summer your feet can get hot quickly. This made me look for some sandals so I could get some air circulation/coolness in my feet. However, all the sandals I saw provided inadequate protection for my toes.
Basically, all sandals "expose" your toes. They all come with some straps around the other parts of your feet to keep them in place. And, I'm not about to wear flip flops because they look and feel flimsy. I'm kinda sensitive to protecting my toes since I severely mashed my "index" toe while riding a cruiser with flip flops as a kid.

I was familiar with Keen Newports but I had dismissed them a few years ago because they were a little fugly. I never saw them as a biking shoe/sandal. As I thought more protecting my toes, the only sandals that seemed to offer what I was looking for were the Keen Newports. They have this really strong rubber toe box/cap, which I like. The sandals offer plenty of cross ventilation. They look very well made as their stitching looks strong.
The negatives I have with them are that: 1) they're still not that strong in the looks department, 2) The insoles are hard; I wish they had cushier, softer insoles and 3) they're slightly heavier than your basic sandals. There are some reviews out there that say that Keen Newports are the most comfortable sandals ever made. I wouldn't go that far, though.
Anyway, if you're looking for some summer sandals that can protect your toes while biking, I would consider the Keen Newports. (Tag: Review of Keen Newport Sandals)
Summer's here and I doing more casual riding. By this I mean going to the grocery store, ATM machine, ice cream or coffee shop. I had been doing this with my running sneakers, but when you ride in the summer your feet can get hot quickly. This made me look for some sandals so I could get some air circulation/coolness in my feet. However, all the sandals I saw provided inadequate protection for my toes.
Basically, all sandals "expose" your toes. They all come with some straps around the other parts of your feet to keep them in place. And, I'm not about to wear flip flops because they look and feel flimsy. I'm kinda sensitive to protecting my toes since I severely mashed my "index" toe while riding a cruiser with flip flops as a kid.

I was familiar with Keen Newports but I had dismissed them a few years ago because they were a little fugly. I never saw them as a biking shoe/sandal. As I thought more protecting my toes, the only sandals that seemed to offer what I was looking for were the Keen Newports. They have this really strong rubber toe box/cap, which I like. The sandals offer plenty of cross ventilation. They look very well made as their stitching looks strong.
The negatives I have with them are that: 1) they're still not that strong in the looks department, 2) The insoles are hard; I wish they had cushier, softer insoles and 3) they're slightly heavier than your basic sandals. There are some reviews out there that say that Keen Newports are the most comfortable sandals ever made. I wouldn't go that far, though.
Anyway, if you're looking for some summer sandals that can protect your toes while biking, I would consider the Keen Newports. (Tag: Review of Keen Newport Sandals)
Subscribe to:
Posts (Atom)